
It’s no secret that the more media you have on your site, the more frequently and thoroughly your content will be consumed. Images, audio, video, text, and yes, social media, should all be in play on your church website. This post (which will be continued in a second post) will break each of these down and give you some tips for implementing them.
First off, let’s take a look at my claim that multimedia increases viewership. There is no direct data that relates to church website consumption by media type, but a company called “PR Newswire” has been tracking the effectiveness of multimedia in press releases since 2011. They published this infographic on the subject.
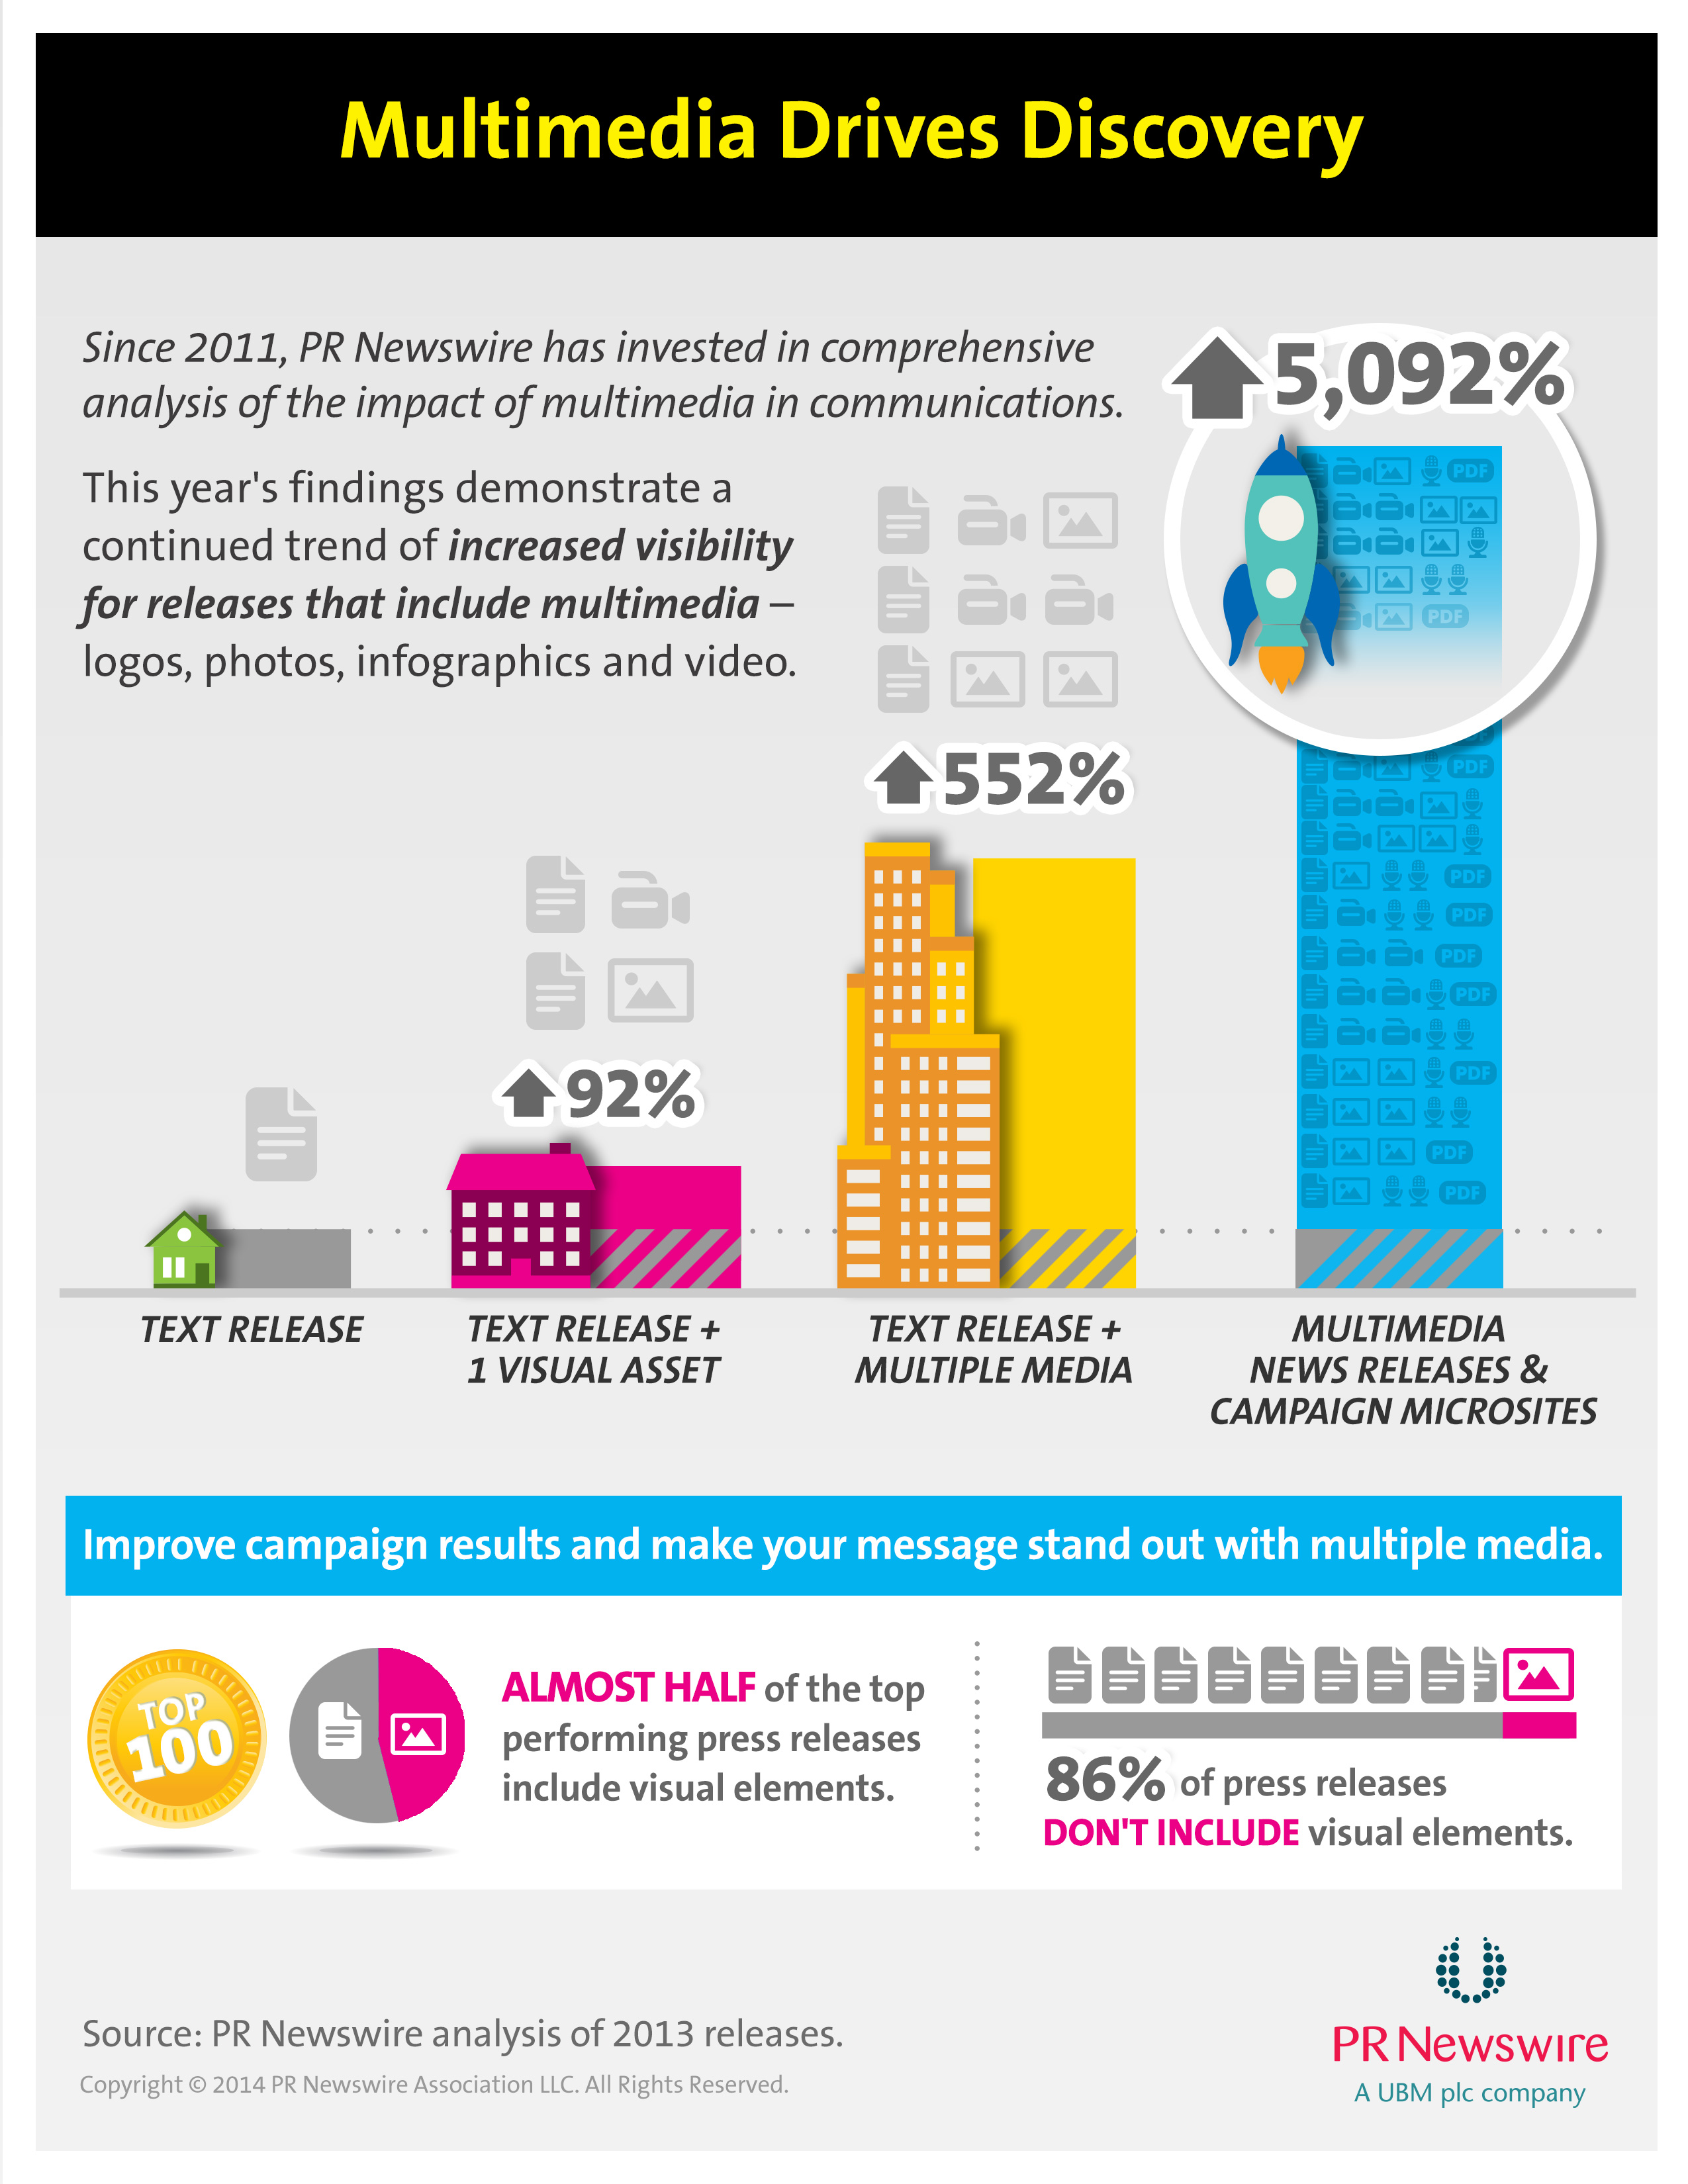
Why would we ever publish anything without at least one image attached? We live in a media age, and our communications should reflect that. Here is a breakdown of each type of media, in order of complexity.
Text
This may seem self-explanatory, but there are actually multiple ways you can use text effectively.
1. An Intriguing Title: You must pique you readers’ interest to get them to read beyond the title. I recently gave a seminar to a group of Christian educators called “From Classrooms to Maker Spaces” about using Internet startup culture to spur innovation in the church. The session was well-received and was packed full, but many people–despite liking the session–commented that the title was misleading. In my mind, that’s proof that the title was great! So instead of saying, “Church Picnic this Sunday” try, “Get Ready to Stuff Your Face this Sunday” instead!
2. Tweet-ability: How easy it for someone to share your information as a Tweet? This doesn’t mean that every thing you write should be under 140 characters, but you should consider leading or finishing with a 140 character synopsis. Sometimes this is referred to as the TL;DR section (Too Long; Didn’t Read) when used at the end, and it can be proceeded by “TL;DR:”. You can also embed short pull-quotes which offer a main point suitable for social media.
3. Print-ability: This is particularly important when you post a sermon or other long-form writing. Do your readers a favor by attaching a PDF or Word document. They will be able to save or print the attachment and read it later when they have more time to consume it. In most website systems you can attached a text document the same way you would attach an image.
4. Scan-ability: 55% of viewers spend less than 15 seconds reading your blog post (blogspot). Digital natives will often scan your post before they decide to read it, or they will just scan it and be done. Bullet points, lists, bold headings, and indentation are the best ways to make your content scan-able. Also, try to make sure the reader can pick up the Who, What, When, Where, and Why just from scanning the document.
Images
As noted in the infographic above, use one good image and your readership could go up by 92%. It’s safe to say that most every post or page on your website should be accompanied by an image. Here the major considerations:
1. Image Size: A church website system will take an image that you upload and automatically convert it behind the scenes into several useful sizes. What we’re mainly concerned about is:
A. Is the image big enough for its largest use?
Having an undersized image will lead to a blurry or pixelated look. Size is measured in pixels and can usually be found in the file properties (right click > properties > details). Figuring out what sizes to use on your website is a little trickier and there aren’t exact rules. Perhaps the easiest way to determine this is to look at the size of an image that works well. Save the image to your desktop and look at its file properties. Otherwise, check your website documentation or use a ruler extension for your web browser. I use Page Ruler for Chrome.
B. Is the image in the right proportions (or aspect ratio)?
Often a website component is built to require an image with a specific proportion. Other times, the website is smart enough to use any size image by dynamically resizing it. This is not always the best solution, however, as you lose control over the sizing of your image. The two most common aspect ratios are 16:9 (Widescreen) and 4:3 (Fullscreen) because most monitors are made that way. By the way, the most popular screen sizes are widescreen and are 1920 x 1080 pixels and 1366 x 768 pixels, because they can both display High Definition video.
C. Do you have the right amount of Pixels Per Inch?
Web quality images are almost always 72 ppi (or pixels per inch), because most monitors display at the same resolution. For contrast, images made for print use are almost always 300 ppi, because that’s just above what most printers can print. Both resolutions will work on a website. However, using anything more than 72 ppi will make it hard to compare images and will take some math to determine what size the image will display at on a monitor.
2. File Type: There are 3 types of images common to websites, each with their own specialized use:
A. .jpg (jay-peg, which stands for Joint Photographic Experts Group)
jpgs are the most common image file type on the internet because they compress to the smallest file sizes. Always use a jpg unless you have a specialized use for the image associated with one of the other file types.
B. .gif (jiff or giff, which stands for Graphics Interchange Format)
.gifs are useful because they can contain simple animations. A lot of times these animations are garish, but used effectively, they can add some action to your website. Animated gifs require a special graphic program, like Adobe Fireworks, to make them. However, there are lot of free applications out there you can use.
C. .png (p-en-gee or ping, which stands for Portable Graphics Network)
Both gifs and pngs contain layered information. That means they can keep your background, text and parts of your image separate.
Doing so allows them to display text as characters instead of images and display vectorized images instead of bitmaps. (Translation: the lines are sharp instead of pixilated.) Because this sharpness scales upward and downward, pngs are great for logos.
3. File Size: We’ve all used a site where–despite our fast Internet connection–it just takes forever for the images to load. This is because the images are too large and the website isn’t smart enough to downsize them. The rule of thumb has always been that your image should be less than 100 kilobytes; however, this may be changing as website resolutions and Internet speeds improve. In order to shrink the file size of an image you first need to resize its pixel size, then compress the image until you hit the desired file size. You’ll need an image editor to do that, such as the marvelous and free Irfanview.
4. Usage Rights: Finally, you need to determine if you have the right to publish the image you want to use. There are many different types of usage rights to take into consideration, including:
A. In-house Photography
You would think that just because you took an image you have the rights to use it however you want, but the issue of consent for human subjects still remains. It would be hard for a church to ask for consent every time it takes an image. Instead, I recommend that you provide an “opt out” option every time you audit your member records. In other words, tell your congregation that images of them may be used unless they specify otherwise. Finally, publishing pictures of juveniles can put them at risk from cyber-stalkers. You can still publish them, but never identify the subject by name, as this will keep the images from being searchable.
B. Stock Images
You can pay for the rights to use stock photography. There is a stigma around doing this but the selection, quality, and price has gotten much better. Be careful though and read the usage terms! Even though you’ve purchased the image, some image providers still require you to credit them within the publication (particularly when they are used for websites or emails).
C. Creative Commons Licensed Images
These are images where the owner has labeled them as being for free use in certain circumstances. There are three levels of use: 1) re-use with modification, 2) re-use without modification, and 3) re-use for non-commercial purposes (which is true for most church functions). The best place to start when looking for Creative Commons images is http://search.creativecommons.org/.
D. Fair Use
Finally there is fair use. Fair Use laws are ambiguous and harder to prove in court. The basic concept is that if you are using a piece of media for the greater good (i.e. using it to teach something) and are not profiting from it, and if it doesn’t contain any trademarked material, then using it should count as fair use. An example would be using a still image from a movie in your blog post.
In my next post I’ll talk about using audio, video, and social media.